Want to build a terrarium but don't want to pay for a workshop? Join our free terrarium building class and learn how to create a thriving indoor ecosystem.
The Ultimate Free Terrarium Building Class: A Step-by-Step Workshop
The Ultimate Free Terrarium Building Class: A Step-by-Step Workshop
Local terrarium building workshops can cost anywhere from $75 to $150 per person. But what if you could get the exact same curriculum, expert tips, and step-by-step guidance without ever leaving your home? Welcome to your virtual terrarium building class.
Whether you want to create a lush, tropical houseplant terrarium or a dry, desert-scape, this guide is designed to walk you through the science and art of building a self-sustaining ecosystem. Grab a glass jar, and let's get to work.
What You Will Learn in This Terrarium Building Workshop
- How to choose the right glass vessel for your plants
- The exact science behind drainage layers (and why gravel is a bad idea)
- How to mix the perfect "chunky" terrarium substrate
- Which plants thrive in enclosed environments (and which to avoid)
- How to water and maintain your setup for years to come
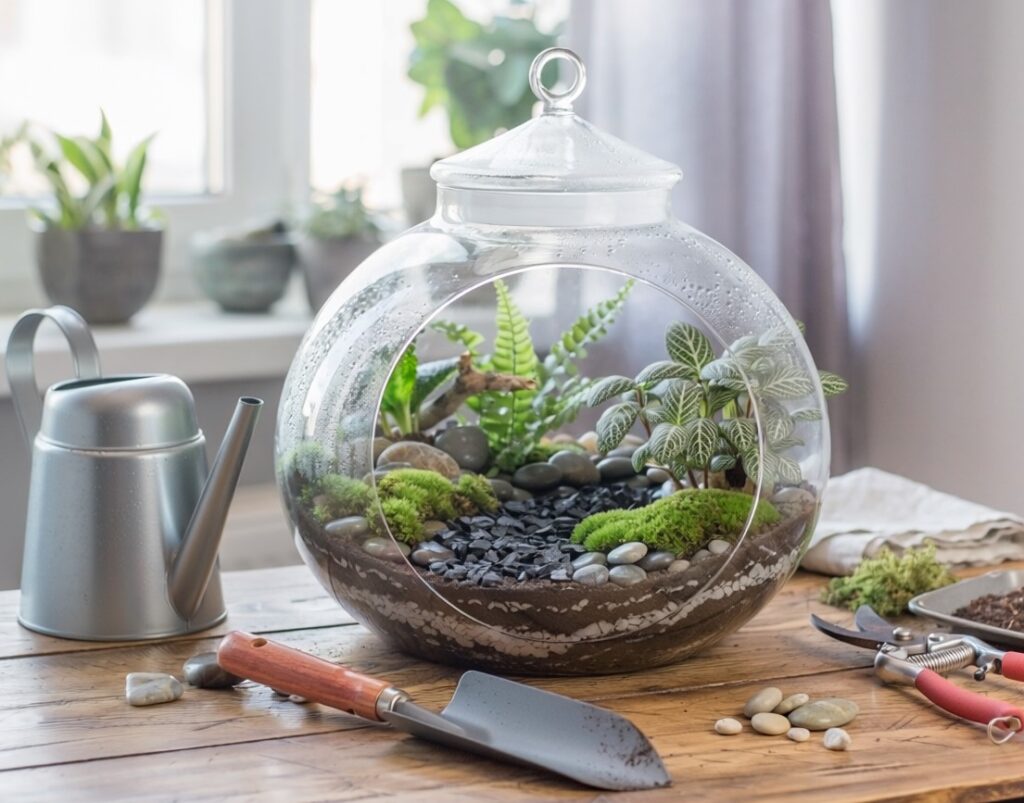
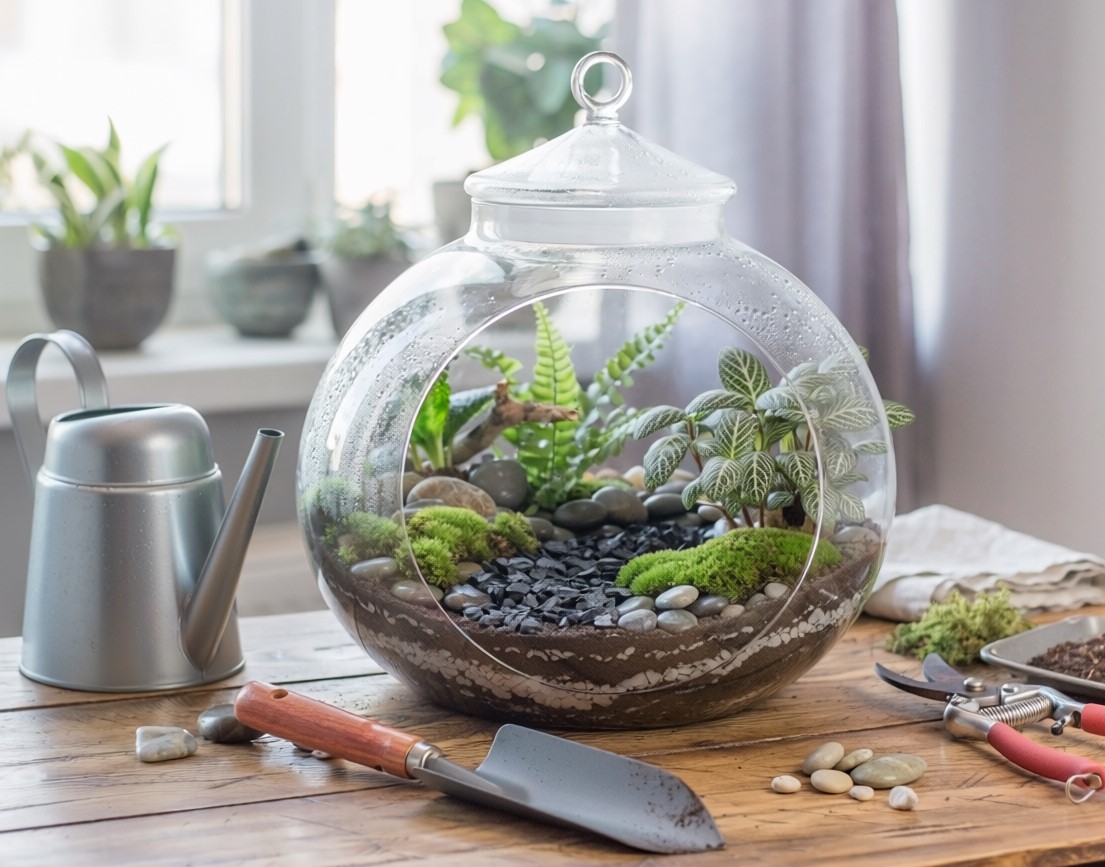
Module 1: Choosing Your Vessel
When you build a terrarium, the container is your entire world. You have two main choices: open or closed.
Closed terrariums are ideal for tropical plants. They create a water cycle—moisture evaporates, condenses on the glass, and rains back down onto the soil. Open terrariums are better for succulents and cacti, as they allow for necessary airflow and prevent root rot.
When selecting a jar, look for something with a wide enough mouth to fit your hand (or a tool) inside. Upcycled mason jars, glass cookie jars, or specialized geometric planters all work beautifully. Just ensure there are no cracks and that the glass is clear, not tinted, so your plants get adequate light.
Module 2: The Drainage Layer (The Foundation)
In a standard potted plant, excess water drains out the bottom. In a glass terrarium, water has nowhere to go. If water sits at the roots, your plants will drown and develop root rot.
Pro Tip: Forget standard aquarium gravel. Experienced indoor gardeners highly recommend using LECA (Lightweight Expanded Clay Aggregate) or perlite at the bottom. These materials have microscopic pores that absorb excess water, acting as a reservoir rather than just a solid barrier.
Add a 1.5 to 2-inch layer of LECA or coarse perlite to the bottom of your jar.
Do You Really Need Activated Charcoal?
Almost every terrarium building class will tell you to add a layer of activated charcoal above your drainage. The idea is that it filters the water and keeps the soil from smelling sour.
However, many advanced botanical hobbyists argue that charcoal is largely unnecessary in a clean setup unless you are tossing in raw organic matter like dead leaves or uneaten fruit. If you use clean materials, skip it. If you want peace of mind, sprinkle a thin layer over your drainage—it won't hurt.
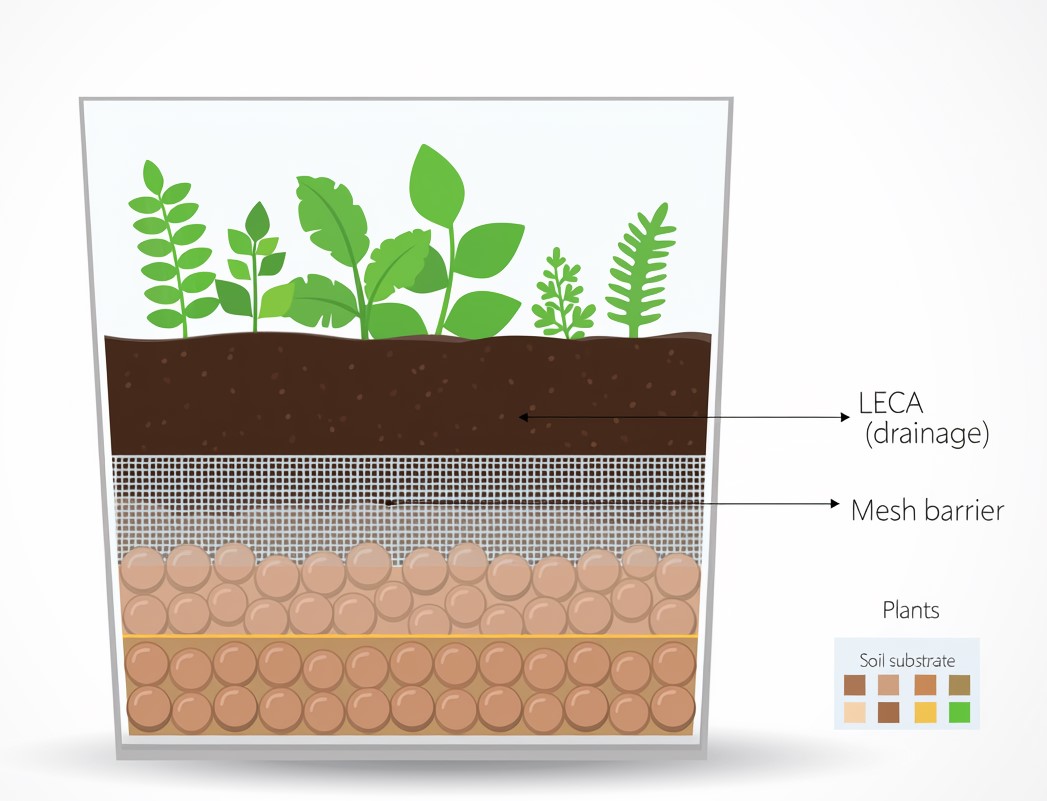
Module 3: The Soil (The Lifeline)
Do not use dirt from your yard, and do not use cheap, dense potting soil. For a successful houseplant terrarium, you need a soil mix that retains some moisture but drains incredibly fast.
Experienced creators rely on a "chunky" mix. A great baseline recipe is:
- 40% Coco Coir (for moisture retention)
- 30% Orchid Bark (for chunky drainage and airflow)
- 20% Perlite or Pumice (to keep the mix light)
- 10% Worm Castings (for natural, slow-release nutrients)
Add 2 to 3 inches of this mixture on top of your drainage layer. Pat it down gently to remove large air pockets, but don't compress it so hard that the roots can't breathe.
Module 4: Selecting and Planting
This is where most DIYers fail. The absolute golden rule of a closed terrarium building workshop is to never put succulents or cacti in a closed jar. They will rot and turn to mush.
You need plants that thrive in high humidity and low light. The holy grail plants for a closed ecosystem include:
- Fittonia (Nerve Plant): Comes in stunning pink, red, and white veins. They are the ultimate terrarium indicator plant—if they droop, it's time to water.
- Ferns (like Lemon Button or Maidenhair): Bring beautiful, fluffy texture to the background.
- Pilea (Friendship Plant or Aluminum Plant): Great for adding bushy, mid-height greenery.
- Selaginella (Spike Moss): Looks like a miniature forest floor and loves humidity.
Arrange your plants before planting them. Start with the tallest plants in the back, and use tweezers or a long spoon to dig small wells in the soil. Gently tease the roots of your nursery plants before placing them in the soil, and pack the dirt tightly around the base of each plant.
Module 5: Watering and Aftercare
When you finish your build terrarium class project, you might be tempted to pour a bottle of water inside. Don't.
Use a spray bottle to mist the leaves and soil until it is damp, but not swampy. If you see standing water in your drainage layer at the bottom, you used too much. Use a paper towel or turkey baster to soak it up.
Place your finished terrarium in indirect light. Direct sunlight will cook your plants inside the glass (the greenhouse effect is very real). Within a few days, you should see condensation form on the glass. If condensation covers the entire glass so you can't see inside, open the lid for a few hours to let it breathe. If there is no condensation at all, give it a few more sprays of water.
Troubleshooting Your Terrarium
Even in a professional terrarium building workshop, things can sometimes go sideways. Here is how to fix the most common issues:
- Yellow leaves: Usually a sign of overwatering. Remove the affected leaves and leave the lid off for 24 hours.
- White fuzzy mold: Totally normal in a new, high-humidity environment. Scrape it off with a spoon, leave the lid off for a day to lower humidity, and avoid deadheading (leaving dead plant matter inside).
- Crispy brown leaves: The air is too dry or the light is too direct. Move to a shadier spot and mist lightly.
Building a terrarium is an exercise in patience. It takes a few weeks for the micro-climate to balance itself out. Follow this free curriculum, resist the urge to overwater, and you will have a beautiful, living piece of art that thrives for years.
Frequently Asked Questions
How long do closed terrariums actually last?
If built correctly with proper drainage, the right soil, and appropriate plants, a closed houseplant terrarium can survive for decades. In fact, there are famous sealed terrariums that have been entirely cut off from outside air and water for over 50 years, surviving solely on the recycled moisture and photosynthesis inside the jar.
Do closed terrariums need direct sunlight?
Absolutely not. A closed glass jar acts as a magnifying glass and a greenhouse. If you put it in direct sunlight, the internal temperature will spike rapidly and literally cook your plants. They thrive best in bright, indirect light—such as a few feet away from a north or east-facing window, or under a dedicated grow light.
Can I just use regular potting soil from the bag?
It is highly discouraged. Standard bagged potting soil is designed for traditional pots with drainage holes; it is often too dense and retains too much water. In a sealed glass environment, dense soil will quickly become a swampy, anaerobic mess that causes root rot. You need a specialized "chunky" mix containing orchid bark, perlite, and coco coir to mimic a forest floor.
Why shouldn't I put succulents in my closed terrarium?
Succulents and cacti have evolved to survive in arid, dry deserts with massive amounts of airflow and fast-draining sandy soil. When you put them in a humid, enclosed glass jar, they absorb moisture from the air through their leaves, their cells swell, and they inevitably rot and melt. Always keep succulents in open bowls with sandy soil.